Select Tools > Bulk Costing & Analysis to display the Bulk Costing & Analysis window.
You can use the options in this window to:
After setting these inputs, you can cost the bulk cost group - see Costing a bulk cost group.
Create a Bulk Cost Group
-
Ensure that the parts that you want to analyze together are in or underneath the same folder. You may need to organize the parts and assemblies into either a single folder or a set of sub-folders underneath a single, top-level folder.
-
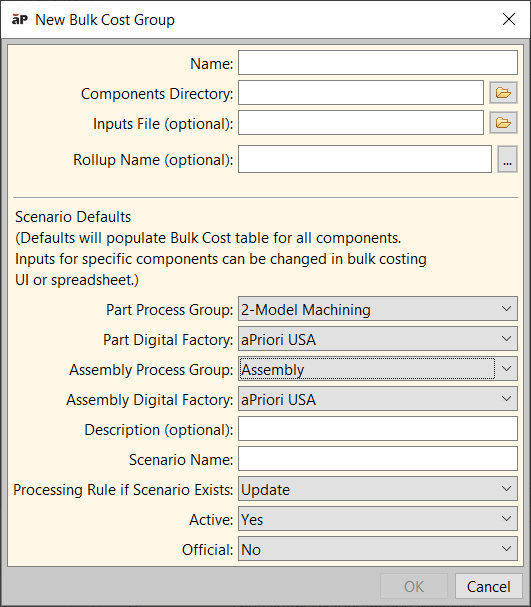
Click File > New Bulk Cost Group from the aPriori Bulk Costing & Analysis menu bar to display the New Bulk Cost Group window.
-
Name: Enter a name for the group. If you do not enter this, it will default to the folder name specified in the next step.
-
Components Directory: Click
 next to the field and navigate to and select the folder where the parts and assemblies are located. aPriori import all parts and assemblies located in the selected folder and any/all subfolders.
 -
Inputs File: (Optional) Click
next to the field to navigate to and select a user inputs file spreadsheet in either Excel or CSV format of cost inputs. See Supply Bulk Costing Data from a Spreadsheet and Editing bulk costing inputs. - Rollup Name(Optional) Specify a name for the rollup that will be created from the results of this bulk load.
It is good practice to use a descriptive name such as: bulk_load_test_mm-dd-yyyy
- If you leave this field blank the parts will not be added to a rollup.
- If you specify a the dialogue will update and display a new optional field Output Report File.
- Output Report File(Optional) This field appears only if you have specified a Rollup Name as described above. This field you to specify an Excel file Spreadsheet Report . The name of the file must end in .xls or xlsx. If you do not specify an output file, no spreadsheet report is created.
- Set values that will serve as scenario defaults for all components. To specify inputs for individual components, go to the Bulk Costing & Analysis window, or the Inputs File spreadsheet.
- Part Process Group: Select the default process group Casting, Forging, Sheet Metal that assigned to parts when not otherwise defined.
- Part Digital Factory: Select the default Digital Factory such as “USA”, China”, “India” that used to cost non-parent components unless otherwise defined.
Assembly Process Group: Select the default
Assembly Digital Factory: Select the default Digital Factory such as “USA”, China”, “India”, etc.) that will be used to cost assemblies unless otherwise defined. This makes it easier to cost products that are assembled in one location using parts produced in other locations.
Description: ( text that might be helpful to identify or explain the purpose of this Bulk Cost group.
Scenario Name, Processing Rule if Scenario Exists, Active, and Official: see Scenario support fields.
-
Click OK. The parts and assemblies will be displayed in the aPriori Bulk Costing & Analysis window, but not yet costed or analyzed.
-
Click the Save button to save the bulk cost group.
To enter bulk costing parameters and other information about the components, see Editing bulk costing inputs.
Open an existing bulk cost group
-
Select File > Open Loader File from the aPriori Bulk Costing & Analysis menu bar to display the Open Loader File window.
-
Navigate to the desired loader file (loader file filenames end loader.xml), select it, and click Open.
-
This displays a pre-populated instance of the New Bulk Cost Group window. This gives you the opportunity to adjust the values provided by the loader file. When done, click OK to display the Bulk Costing & Analysis window with the saved Bulk Cost Group.
Edit Bulk Cost Group Components
-
You can edit details in the table displayed:
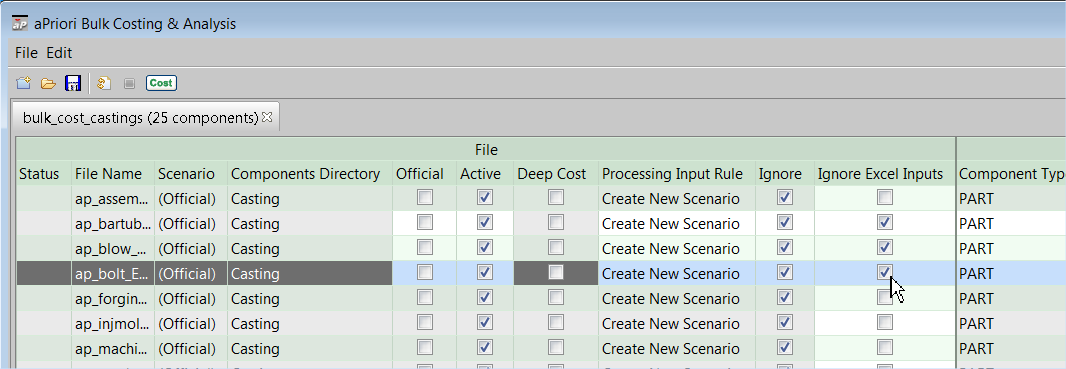
Editable fields are highlighted, read-only fields are grayed.
For more information, see Bulk Costing Data Fields.Note: If you specified an Inputs File on the New Bulk Cost Group, all entries defined in that spreadsheet are by default read-only in the Bulk Costing & Analysis window. To edit an entry, you must first select its checkbox under the Ignore Excel Inputs column. This column is not displayed if you did not specify an Inputs File.
- Enter input values for these fields, in one of the following ways:
- One part at a time in the table - for each field you wish to edit, select the field and enter the desired value.
Enter identical information for multiple parts at a time, selecting multiple parts, then right-click and select the appropriate menu option corresponding to the group of data that to edit (such as Production Info), in the pop-up window that appears.
Use Microsoft Excel to enter multiple data fields, for all except for Process Routing. Select Edit > Copy Entire Table, paste the information into Microsoft Excel, then edit values in Excel. When done, copy the data in Excel, then in aP Pro select Edit > Paste to paste these values back.
Parts must be in the same order in the Bulking Costing Tool and Excel when copying data from Excel into aPriori.
Specify an external spreadsheet (Inputs File) to provide inputs. See Supply Bulk Costing Data from a Spreadsheet.
- To temporarily remove a component from the costing operation, click its Ignore checkbox. You can also remove a component permanently if the bulk cost group has been recently created but not yet saved, by deleting its file from the Components Directory and clicking File > Refresh.
- A component is not removed from the Bulk Costing & Analysis UI even after you remove its CAD file from the Components Directory :
- It is defined in a user inputs file.
- The bulk cost group was opened from a loader.xml file.
- A component is not removed from the Bulk Costing & Analysis UI even after you remove its CAD file from the Components Directory :
-
Click the Save button or select Save from the File menu to save your edits.
For more information, see Editing bulk costing inputs. -
To add new entries for files that have been added to the Components Folder, select File > Refresh Files.
Create a new row from an existing row
You can quickly create a new row in the Bulk Costing & Analysis UI using an existing row as a starting point:
-
Select the existing row.
-
Click Create from this row... from either the Edit menu or the right-click context menu.
This menu item is enabled only if:
-
One row is selected
-
A user inputs file is not provided for this row.
-
The component row is CA-connected (“Components Directory” is populated), such that Bulk Costing knows where the CAD file is located.
-
All inputs of the selected row will be copied to the new row except for the scenario name and the setting of the "official" field.
Note: aPriori disables the Create From This Row menu item if the CAD file for the selected row is not CAD-connected. The new scenario will fail to cost if there are no GCDs for the new scenario, that is, the Bulk Costing Child process will not copy the scenario).